Saturday, October 18, 2014
Back in Taiwan, after 4 years
It's been a long time since I abandon this blog and continue to write on my other blog ( which I also kinda abandon it as well when I discovered lots of new things on internet about this free CMS under google apps, which then leap me back to this blog ). My last post on this blog was in 2010, that was so 4 years a go, and where was I last 4 years ago ? Taiwan :). I remember landed here 4 years a go exactly at the same date, 19th October 2010. That was my very first international breakthrough integration projects. Yes, my first real international integration project on telecommunication industries if I may say so, because the previous one in 2007 did not actually a telecom project. It was mere an IT project where the company I work for was hired to build a web portal for an operator in Malaysia, but still, it's a web portal, it's IT, not Telecom :).
First international project, alone, in a country where they don't use english on their daily live activities, what a combination. And also, that was my first year on ///, what experience do you expect from someone that just handling few telecom nodes with not-so-much experience ?
Well, luckily for me, for that 2 months there, everything seem to go well. I got a lots of help from the local team, from my home base team, and also from prays that never stops from my family of course :) I learned a lots of new things, new techniques, new details that I never think of before. And what's better from all that ? I make new friends and new colleagues from around the globe.
And now, 4 years later, I have moved to another country but still at the same company, and thankfully they still remember me, and invited me to come over again for another project. I really don't think this is fully because of my knowledge. I was a newbie 4 years a go, what knowledge and experience do you expect from that ? I believe this is more because of the relationship that I built with them for these past years. In Islam we call it Silaturahim, maintaining the relationship with everyone that has been worked with you. This is something I really learn from my past. I know I have let down some people by not finishing the projects they gave me when I was still in college. And I also remember some projects I couldn't finish during my first transition during the graduation and move to Jakarta. I still remember that all, and it will always be my reference to not do that again.
================
From Abu Hurayrah radi 'anhu, he said, "I heard the Prophet Sallallaahu' Alaihi Wa Sallam said, 'Whoever wants his sustenance expanded and their age extended , he shall maintain his relationship with his friends" (HR. Al-Bukhari no. 5986 and Muslim no. 2557).
Saturday, August 14, 2010
Bye bye OpenSolaris ?
So, I heard that OpenSolaris will be dead a.k.a discontinued.
Me my self, currently has no reason to use OpenSolaris. Why ? Simple question, what cant a Solaris box do compared to OpenSolaris ? currently Solaris also stil free, gcc stil runs on it, (sunfreeware.com ?). Need to install Oracle ? Oracle onlys supports Solaris distribution - not OpenSolaris. Need SUN's good old JDK ? use Solaris :) Not to mention that OpenSolaris distro's loves x86 too much instead Sparc ( well, almost all of my machines in my test lab were sparc :D ). Nexenta for example, the one that I -was- believe to be the ice breaker in Solaris world with their apt-get style, seems love x86 too much. Not too mention the stupidness of OpenSolaris AI installer for Sparc, which need an x86 OpenSolaris to be installed first, plus its additional macro thingy to be configured during wanboot. Why would I need that in Solaris ? Why cant I just plug the disc and do boot - install to my sparc machine ?
So now, there are only 2 options for my sparc machines, use Solaris, or Linux :D. Debian can run on Sparc platform. Just install sparc-utils, and we'll get the similar administration CLI just as we did on Sparc Solaris.
But too bad, Debian's apt package for solaris mostly compiled for 32 bit platform. If we need to boost the performace for our apps, we should re-compile it. No big deal, gcc is available :)
Tuesday, August 10, 2010
Solaris Jumpstart on Linux
Intro :
- Linux, Debian based (mine: Lenny), hostname : pegasus, act as the Solaris jumpstart server.
- Solaris, Solaris 10, hostname: solclient, will be the machine to be installed.
- IP addresses range 192.168.10.x (class C), make sure you use standard network class IP, this is where the standard broadcast address (192.168.10.255) comes into play during arp broadcast.
- solclient will broadcast arp request, replied by pegasus's rarpd, and then and IP address will be assigned. solclient will then download the minimum kernel using tftp. The kernel file name will be the ip address of the solclient. For example, if the assigned IP is 192.168.10.5, and then the kernel name will be C0A80A05. Another way is to use this command:
elinpra@pegasus > printf "%02X%02X%02X%02X\n" 192 168 10 5
C0A80A05
This file should be stored inside the root directory of tftp. Check the tftp setting on /etc/inetd.conf. Here is mine:
elinpra@pegasus > cat /etc/inetd.conf
tftp dgram udp4 wait nobody /usr/sbin/tcpd /usr/sbin/in.tftpd /srv/tftp/
Then, the file C0A80A05 should be put in /srv/tftp.
Steps :
1. Install bootparamd, rarpd, tftpd and nfs-kernel-server in Linux server (pegasus)
root@pegasus > apt-get install bootparamd rarpd tftpd nfs-kernel-server
2. Run iptables -F, make sure no firewall in Linux server
root@pegasus > iptables -F
3. Check the mac address of the solaris client.
Try boot from {ok}, see the mac address during booting (if the system is currently up, go to init 0 mode) :
ok boot net
Resetting ...
LOM event: +56d+21h39m43s host reset
þ
Sun Fire V120 (UltraSPARC-IIe 648MHz), No Keyboard
OpenBoot 4.0, 1024 MB memory installed, Serial #61911409.
Ethernet address 0:3:ba:b0:b1:71, Host ID: 83b0b171.
Back to lom> or sc> using 'break' command.
4. Set /etc/ethers and /etc/hosts in Linux server with the mac address and hostname of the solaris client.
elinpra@pegasus > echo "0:3:ba:b0:b1:71 solclient" >> /etc/ethers
elinpra@pegasus > echo "192.168.10.5 solclient" >> /etc/hosts
5. Start the rarpd if has not started yet.( I’m using debian based linux here )
root@pegasus > /etc/init.d/rarpd start
6. If you're installing using Solaris iso file, mount the iso file to a directory using the following command, otherwise if using Solaris CD/DVD, directly go to step 8:
root@pegasus > mkdir -p /mnt/sol10
root@pegasus > mount -o loop solaris_iso_file.iso /mnt/sol10
root@pegasus > cd /mnt/sol10
7. If you have the Solaris 10 CD, insert it on pegasus, do the following steps :
root@pegasus > cd /mnt/cdrom/ (to your solaris cdrom directory)
8. Find the suitable kernel for your machine type. Mine is SunFire v120, so it will be sun4u type. If your hardware is T5220, T2000 etc then you need sun4v kernel.
Locate the kernel on directory Solaris_10/Tools/Boot/platform/sun4u/inetboot for sun4u, or Solaris_10/Tools/Boot/platform/sun4v/inetboot for sun4v.
Copy it to /srv/tftp and make symbolic link to that file into C0A80A05.
root@pegasus > cp inetboot /srv/tftp
root@pegasus > ln -s /srv/tftp/inetboot /srv/tftp/C0A80A05
9. Start tftpd daemon in pegasus :
root@pegasus > /etc/init.d/openbsd-inetd restart
10. start nfs service in pegasus :
root@pegasus > /etc/init.d/nfs-kernel-server start
11. Prepare nfs mount so that solclient later on can download the entire installation package using nfs mount. Set the mount root into where the cdrom or iso files are mounted. Make sure that the nfs mount root from solclient is /sol10.
root@pegasus > exportfs \*:/mnt/cdrom -o fsid=0,ro,no_root_squash,crossmnt,no_subtree_check,sync <<- for CD/DVD or root@pegasus > exportfs \*:/mnt -o fsid=0,ro,no_root_squash,crossmnt,no_subtree_check,sync <<>Check if the nfs shares can be mounted correctly.
root@pegasus > mount -t nfs4 pegasus:/sol10 /tmp/somewhere
Verify in your mount list :
root@pegasus > df -kh
Go to /tmp/somewhere, and make sure there’s a directory called sol10/, if not, then the nfs root stil wrong.
13. Configure bootparams in /etc/bootparams, fill in this entry:
solclient root=pegasus:/sol10/Solaris_10/Tools/Boot install=pegasus:/sol10/ boottype=:in
14. You might want to see what's happen in your pegasus using tcpdump:
root@pegasus > tcpdump -i eth0
tcpdump: verbose output suppressed, use -v or -vv for full protocol decode
listening on eth0, link-type EN10MB (Ethernet), capture size 96 bytes
10:35:16.385289 arp who-has osol1 (Broadcast) tell osol1
10:35:16.786701 IP pegasus > OSPF-ALL.MCAST.NET: OSPFv2, Hello, length: 44
10:35:17.904404 IP solclient.syslog > 255.255.255.255.sunrpc: [|syslog]
10:35:18.666258 IP osol2.58847 > resolver.ao.ericsson.se.domain: 57879+ TXT? _nfsv4idmapdomain. (35)
10:35:18.692884 IP resolver.ao.ericsson.se.domain > osol2.58847: 57879 ServFail 0/0/0 (35)
10:35:18.693883 IP osol2.58848 > resolver.sw.ericsson.se.domain: 57879+ TXT? _nfsv4idmapdomain. (35)
10:35:18.944002 IP resolver.sw.ericsson.se.domain > osol2.58848: 57879 ServFail 0/0/0 (35)
10:35:18.945066 IP osol2.58849 > resolver.am.ericsson.se.domain: 57879+ TXT? _nfsv4idmapdomain. (35)
10:35:19.349904 IP resolver.am.ericsson.se.domain > osol2.58849: 57879 ServFail 0/0/0 (35)
10:35:19.350799 IP osol2.58850 > resolver.ao.ericsson.se.domain: 57879+ TXT? _nfsv4idmapdomain. (35)
10:35:19.391665 IP resolver.ao.ericsson.se.domain > osol2.58850: 57879 ServFail 0/0/0 (35)
10:35:19.426161 IP osol2.58851 > resolver.sw.ericsson.se.domain: 57879+ TXT? _nfsv4idmapdomain. (35)
10:35:19.713817 IP resolver.sw.ericsson.se.domain > osol2.58851: 57879 ServFail 0/0/0 (35)
10:35:19.714855 IP osol2.58852 > resolver.am.ericsson.se.domain: 57879+ TXT? _nfsv4idmapdomain. (35)
10:35:20.057720 IP solclient.syslog > 255.255.255.255.sunrpc: [|syslog]
10:35:20.125082 IP resolver.am.ericsson.se.domain > osol2.58852: 57879 ServFail 0/0/0 (35)
10:35:21.870552 IP solclient.syslog > 255.255.255.255.sunrpc: [|syslog]
...
10:45:43.677010 IP solclient.afpovertcp > pegasus.nfs: . ack 39685605 win 47784
10:45:43.677183 IP solclient.afpovertcp > pegasus.nfs: . ack 39688501 win 44888
10:45:43.677350 IP solclient.afpovertcp > pegasus.nfs: . ack 39691397 win 41992
...
15. Boot your solclient from ok prompt:
ok boot net -v - install
Boot device: /pci@1f,0/pci@1,1/network@c,1 File and args: -v - install
3a000 Using RARP/BOOTPARAMS...
Internet address is: 192.168.10.5
Bootparam response received
hostname: solclient
domainname: (none)
Found 192.168.10.1 @ 8:0:20:eb:52:e0
root server: jumpstart (192.168.10.1)
root directory: /sol10/Solaris_10/Tools/Boot
module /platform/sun4u/kernel/sparcv9/unix: text at [0x1000000, 0x10a096d] data
module /platform/sun4u/kernel/sparcv9/genunix: text at [0x10a0970, 0x12615bf] da
module /platform/SUNW,UltraAX-i2/kernel/misc/sparcv9/platmod: text at [0x12615c0
module /platform/sun4u/kernel/cpu/sparcv9/SUNW,UltraSPARC-IIe: text at [0x126184
SunOS Release 5.10 Version Generic_139555-08 64-bit
Copyright 1983-2009 Sun Microsystems, Inc. All rights reserved.
Use is subject to license terms.
Ethernet address = 0:3:ba:b0:b1:71
Using default device instance data
mem = 1048576K (0x40000000)
avail mem = 845930496
root nexus = Sun Fire V120 (UltraSPARC-IIe 648MHz)
pseudo0 at root
pseudo0 is /pseudo
scsi_vhci0 at root
scsi_vhci0 is /scsi_vhci
ramdisk0 at root
ramdisk0 is /ramdisk-root
root on /ramdisk-root:a fstype ufs
pcipsy0 at root: UPA 0x1f 0x0
pcipsy0 is /pci@1f,0
PCI-device: pci@1,1, simba0
simba0 is /pci@1f,0/pci@1,1
PCI-device: isa@7, ebus1
ebus1 is /pci@1f,0/pci@1,1/isa@7
pseudo-device: dld0
dld0 is /pseudo/dld@0
SUNW,eri0 : Local Ethernet address = 0:3:ba:b0:b1:71PCI-device: network@c,1, eri
eri0 is /pci@1f,0/pci@1,1/network@c,1
SUNW,eri1 : Local Ethernet address = 0:3:ba:b0:b1:72SUNW,eri1 : Using local MAC
eri1 is /pci@1f,0/pci@1,1/network@5,1
su0 at ebus1: offset 0,3f8
su0 is /pci@1f,0/pci@1,1/isa@7/serial@0,3f8
PCI-device: usb@c,3, ohci0
ohci0 is /pci@1f,0/pci@1,1/usb@c,3
PCI-device: usb@5,3, ohci1
ohci1 is /pci@1f,0/pci@1,1/usb@5,3
cpu0: UltraSPARC-IIe (portid 0 impl 0x13 ver 0x33 clock 648 MHz)
iscsi0 at root
iscsi0 is /iscsi
SUNW,eri0 : 100 Mbps full duplex link up
pseudo-device: zfs0
zfs0 is /pseudo/zfs@0
Configuring devices.
pseudo-device: devinfo0
devinfo0 is /pseudo/devinfo@0
PCI-device: pci@1, simba1
simba1 is /pci@1f,0/pci@1
pseudo-device: pseudo1
pseudo1 is /pseudo/zconsnex@1
PCI-device: ebus@c, ebus0
ebus0 is /pci@1f,0/pci@1,1/ebus@c
PCI-device: pmu@3, pmubus0
/pci@1f,0/pci@1/scsi@8 (glm0):
glm0 supports power management.
/pci@1f,0/pci@1/scsi@8 (glm0):
Rev. 7 Symbios 53c896 found.
PCI-device: scsi@8, glm0
glm0 is /pci@1f,0/pci@1/scsi@8
/pci@1f,0/pci@1/scsi@8,1 (glm1):
glm1 supports power management.
/pci@1f,0/pci@1/scsi@8,1 (glm1):
Rev. 7 Symbios 53c896 found.
PCI-device: scsi@8,1, glm1
glm1 is /pci@1f,0/pci@1/scsi@8,1
power0 at ebus1: offset 0,800
power0 is /pci@1f,0/pci@1,1/isa@7/power@0,800
su1 at ebus1: offset 0,2e8
su1 is /pci@1f,0/pci@1,1/isa@7/serial@0,2e8
pseudo-device: fssnap0
fssnap0 is /pseudo/fssnap@0
pseudo-device: ramdisk1024
ramdisk1024 is /pseudo/ramdisk@1024
pseudo-device: winlock0
winlock0 is /pseudo/winlock@0
pseudo-device: llc10
llc10 is /pseudo/llc1@0
pseudo-device: lofi0
lofi0 is /pseudo/lofi@0
sd3 at glm0: target 0 lun 0
sd3 is /pci@1f,0/pci@1/scsi@8/sd@0,0
pseudo-device: fcp0
fcp0 is /pseudo/fcp@0
pseudo-device: fcsm0
fcsm0 is /pseudo/fcsm@0
pseudo-device: trapstat0
trapstat0 is /pseudo/trapstat@0
pseudo-device: pool0
pool0 is /pseudo/pool@0
pseudo-device: mem_cache0
mem_cache0 is /pseudo/mem_cache@0
pseudo-device: fcode0
fcode0 is /pseudo/fcode@0
sd0 at glm0: target 1 lun 0
sd0 is /pci@1f,0/pci@1/scsi@8/sd@1,0
Using RPC Bootparams for network configuration information.
Attempting to configure interface eri1...
Skipped interface eri1
Attempting to configure interface eri0...
Configured interface eri0
Reading ZFS config: done.
Setting up Java. Please wait...
Serial console, reverting to text install
Beginning system identification...
Searching for configuration file(s)...
Search complete.
Discovering additional network configuration...
Select a Language
0. English
1. French
2. German
3. Italian
4. Japanese
5. Korean
6. Simplified Chinese
7. Spanish
8. Swedish
9. Traditional Chinese
Please make a choice (0 - 9), or press h or ? for help:
Monday, April 5, 2010
Playing around with low end VPS box
Last week I just bought a VPS account for playing around with. It feels so great having our own shell account with root login so that we can do anything inside. I bought it from here. First of all, I bought the minimalist one, with 64mb memory, with no burstable ram :D, using Centos. I simply cant do anything, their Centos installation itself took around 20-30mb ram. I also not well enough playing with Yum. This is not great, so I upgraded the account to 128mb ram. At the same time I noticed that besides Centos, the hosting provider also provide Debian Lenny as the OS....why dont you said that from the beginning ??? :D Now, I'm running Lenny with 128mb ram. The VM specs itself it's not that bad, considering it's powered with 2 cpu @3Ghz, 128mb ram with no swap ( this guy here shares a great script to create a fake swap, but I dont need it any longer ;) read the rest of the entry to know why... ), and with 10Gb disk, more than enough storage for minimalist like me :)
So, first thing first, chop all the unnecessary program, replace it with the program with smaller 'cost'. Just do ps -ef and there I found apache2 and Sendmail sitting around and eating my memory. Just do :
# apt-get remove --purge sendmail apache2And dont forget to kill them, and remove them from startup script.
# kill -9 pid
# update-rc.d -f remove apache2
# update-rc.d -f remove sendmail
Ok, that left me around 5 mb used memory. Not bad :)
Next thing is to replace the default shell, since bash shell become greedy enough to eat my memory. I replaced it with pdksh since after googling around, this pdksh shell saves ~1mb for every shell session...good enough. So I install it :
# apt-get install pdksh
Dont remove the bash shell yet, since it has a lot of dependencies. Leave it there, but dont use it :) How do we do that ? Just edit your own default shell to become pdksh in /etc/passwd :
# vi /etc/passwd
Change the line using /bin/bash, into /bin/pdksh, and voillaa, next login session will be using pdksh.
Not enought with just # prompt ? It's time to decorate your shell with some fancy prompts, just edit the .profile located inside the user's home directory ( just do ls -la to see it, since it's a hidden file ). Add the following line :
HOSTNAME=`hostname`PS1=`print "\027\033[1;32m$USER@$HOSTNAME $PWD > \027\033[0m"`
And then do logout and login again, now you have a green fancy prompt sitting around in your shell prompts.
Next thing we can chop with, is the rsyslogd daemon and the sshd daemon. I got a great reference here. We will replace the rsyslogd daemon with syslog-ng, and replace the open-ssh server with dropbear.
# apt-get install syslog-ng && dpkg --purge rsyslog
And then the dropbear.
# touch /etc/ssh/sshd_not_to_be_run
# apt-get install dropbear
And edit the /etc/default/dropbear to set
NO_START=0. To make sure of what we have change, just reboot the server.
And after fresh reboot, here's what I have in my VPS :

root@ath.cx /root > ps -ef
UID PID PPID C STIME TTY TIME CMD
root 1 0 0 Apr05 ? 00:00:00 init [2]
root 340 1 0 Apr05 ? 00:00:00 /usr/sbin/syslog-ng -p /var/run/
root 348 1 0 Apr05 ? 00:00:00 /usr/sbin/dropbear -d /etc/dropb
root 367 1 0 Apr05 ? 00:00:00 /usr/sbin/xinetd -pidfile /var/r
root 382 1 0 Apr05 ? 00:00:00 /usr/sbin/cron
root 8864 348 0 02:24 ? 00:00:00 /usr/sbin/dropbear -d /etc/dropb
onty 8865 8864 0 02:24 pts/1 00:00:00 -pdksh
root 9192 8865 0 02:51 pts/1 00:00:00 -pdksh
root 9226 1 0 03:01 ? 00:00:00 nginx: master process /usr/sbin/
www-data 9227 9226 0 03:01 ? 00:00:00 nginx: worker process
root 9229 9192 0 03:01 pts/1 00:00:00 ps -ef

root@ath.cx /root > free -m
total used free shared buffers cached
Mem: 128 6 121 0 0 0
-/+ buffers/cache: 6 121
Swap: 0 0 0

Yep, I end up with just 6 mb ram for OS, dropbear, and nginx, and 121 ram free for my other apps.
Saturday, December 26, 2009
Verifying your wordpress.com blog on google webmaster central
Google webmaster is one of google's great application for every webmaster's to dig more on their on websites. Especially if the webmaster wanted to know how google bot sees their website. There we can see what does most people on our websites query for. Also, we can see which other websites that provide links to our website. Want to see it more clearly ? just open webmaster.google.com and type in your gmail's account to log in.
In google webmaster, first you need to register your own site, and then verifies that the site belongs to you. Google provides 2 mechanism for verifying your site. The first method asked the webmaster to add a new html page with some random name provided by google. We must upload it into our site directory and then ask google to verify it. The second method is to add meta tag in your website. If you're using free blog from wordpress, using wordpress.com domain, you will not be able to do the first verification method. Your best bet is to use the second one, which will be explained below.
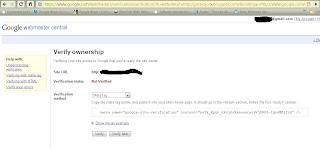
After you add new site to google webmaster, it then brings you to a verification screen. Here, you choose Meta-tag for verification method.

In google webmaster, first you need to register your own site, and then verifies that the site belongs to you. Google provides 2 mechanism for verifying your site. The first method asked the webmaster to add a new html page with some random name provided by google. We must upload it into our site directory and then ask google to verify it. The second method is to add meta tag in your website. If you're using free blog from wordpress, using wordpress.com domain, you will not be able to do the first verification method. Your best bet is to use the second one, which will be explained below.
After you add new site to google webmaster, it then brings you to a verification screen. Here, you choose Meta-tag for verification method.
Copy paste the meta-tag provided by google, and then go to your admin page of your wordpress.com blog.
In your admin dashboard for wordpress.com, go to menu Tools located on left bottom of your page. There should be a page written Webmaster tools Verification on center pane. Paste your Meta-tag there, and dont forget to Save changes.

Back to your google webmaster page, click Verify. After 10-15 minutes, check back to see if it's already verified.
Simple isn't ? First time I try this tools, I spent several hour to find the best verification methods in my wordpress.com, and suddenly when I click the Tools link in my admin dashboard, I found the one I looking for, google webmaster verification, and there it is :)
My other blog is at http://theprasojos.wordpress.com , how about you ?
Subscribe to:
Posts (Atom)